Paver Cleaning and Sealing in Coral Springs: A Real Driveway Project
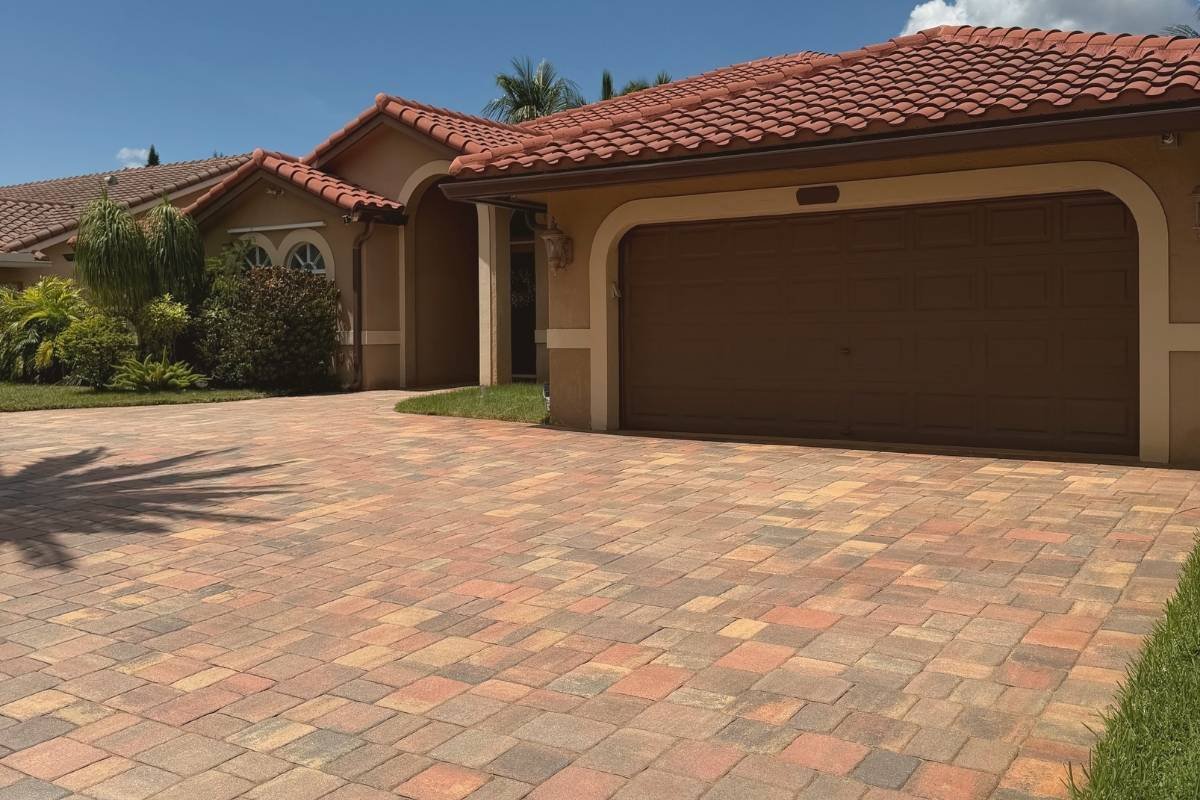
Cleaned, resanded, and sealed paver driveway in Coral Springs.
A real paver driveway and side walkway project involving deep cleaning, weed removal, stain attention, resanding, drying time, and two sealer applications.
Paver sealing is not just the final coat.
On this Coral Springs property, the paver driveway and side walkway needed a full preparation process before sealing could be applied.
The surface showed visible weeds, dark joint lines, uneven color, surface buildup, and areas where the joints needed attention. Applying sealer directly over those conditions would not have addressed the real issue.
Before sealing, the surface needed to be cleaned, cleared, resanded, allowed to dry, and then sealed as part of a complete paver cleaning and sealing process.
That is why this project is a good example of how paver sealing works when it is treated as a system — not as a quick application.
Do your pavers need more than sealing?
Some paver surfaces need cleaning, weed removal, stain attention, resanding, and drying time before sealer should be applied.
In late summer and early fall in South Florida, paver issues often become easier to notice. After months of heat, humidity, rain, and outdoor exposure, weeds, dark joint lines, washed-out sand, stains, and surface buildup can become more visible.
This project is a good example of why paver sealing should start with surface assessment — not with the sealer itself.
Project Overview
This residential project was completed in Coral Springs, Florida.
The work focused on two paver areas:
the front driveway
the internal side walkway along the house
Both areas were part of the same paver system, but each showed different signs of wear.
The driveway had visible buildup, weeds in the joints, and areas where the surface looked dull and uneven.
The side walkway showed stronger weed growth between the pavers, darker joint lines, and a more neglected appearance due to shade, moisture, and organic buildup.
The goal was not only to improve appearance.
The goal was to prepare the surface properly before sealing, restore cleaner joint lines, refill the joints with sand, and apply a joint-stabilizing sealer once the surface was ready.
Why This Project Needed More Than Sealer
One of the most common mistakes with paver maintenance is thinking that sealing alone can solve every issue.
But sealer should not be used to cover over weeds, dirt, stains, loose joints, or surface buildup.
If pavers are dirty, weedy, or unevenly prepared, sealing may lock in problems instead of improving the system.
On this property, the surface needed attention before the sealing stage because the pavers showed:
weed growth between joints
old and dirty joint areas
visible surface buildup
stains and discoloration
faded color
areas where joint sand needed to be replaced
driveway and walkway sections with different exposure conditions
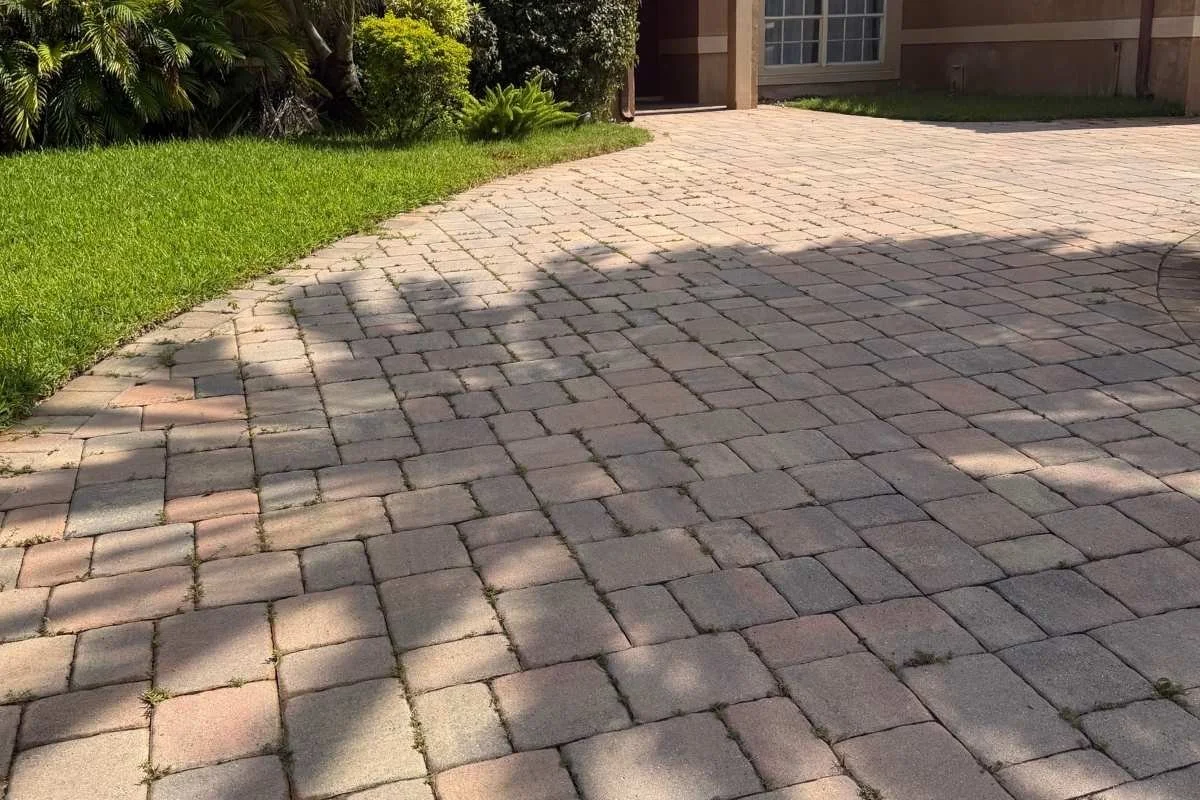
Before cleaning, the paver joints showed weed growth, dark buildup, and areas that needed preparation before sealing.
This is why the project started with cleaning and preparation.
A proper paver cleaning and sealing process begins by understanding what the surface is showing.
Step 1: Deep Cleaning and Weed Removal
The first step was a deep cleaning process to remove buildup from the paver surface and joint areas.
This included addressing weeds growing between the pavers, cleaning surface residue, and improving the visibility of the paver joints before resanding.
Cleaning is not only about making the pavers look better.
It also helps reveal the actual condition of the surface.
Once weeds, dirt, stains, and organic buildup are removed, it becomes easier to see whether the joints need sand, whether stains need additional attention, and whether the pavers are ready for sealing.
On this project, cleaning was especially important on the side walkway, where weeds and joint buildup were more visible.
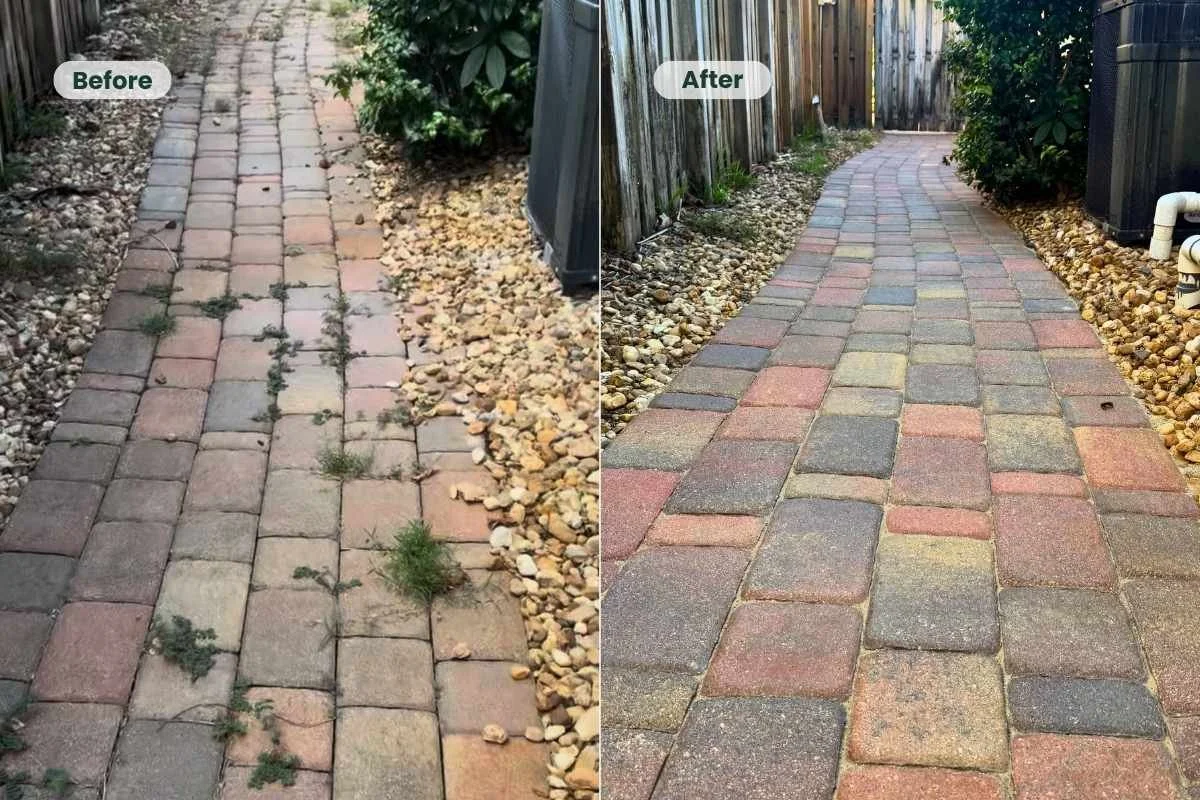
The side walkway showed visible weed growth and joint buildup before cleaning. After cleaning, resanding, and sealing, the surface looked more defined and consistent.
After cleaning, the surface looked more open, defined, and ready for the next stage.
Step 2: Resanding the Paver Joints
After cleaning, the joints were resanded.
This step matters because joint sand is part of the paver system.
When old sand becomes dirty, washed out, uneven, or displaced, the joints may look darker and less defined. Weed growth can also become more visible when joints are not properly maintained.
For this project, the joints were refilled with clean kiln-dried joint sand designed for segmental paver systems.
The purpose of resanding was to replace old or washed-out sand and prepare the paver system for sealing with a joint-stabilizing product.
Joint sand is not only cosmetic.
It helps define the paver lines, supports the system, and creates a cleaner base before sealer is applied.
When paired with the right joint-stabilizing sealer, resanding can help reduce sand washout and make the surface easier to maintain over time.
Joint sand is part of the system.
When joint sand is washed out, dirty, or unstable, resanding may be needed before sealing.
Step 3: Allowing the Surface to Dry
After cleaning and resanding, the surface was allowed to dry before sealing.
This step is important.
Drying time affects how the sealer interacts with the pavers and the joint sand.
In South Florida, this part of the process has to be planned carefully because humidity, rain, shade, and surface moisture can all affect timing.
A surface may look ready from a distance but still hold moisture in joints, shaded areas, or lower sections.
For this reason, the sealing stage should not be rushed.
The goal is to apply sealer when the pavers and joints are in the right condition for the product and the project objective.
Step 4: Sealing With a Joint-Stabilizing Sealer
Once the pavers were cleaned, resanded, and dry, the sealing stage began.
For this project, the pavers were sealed with Trident Hurricane CAT 5, a two-part urethane wet look joint-stabilizing sealer.
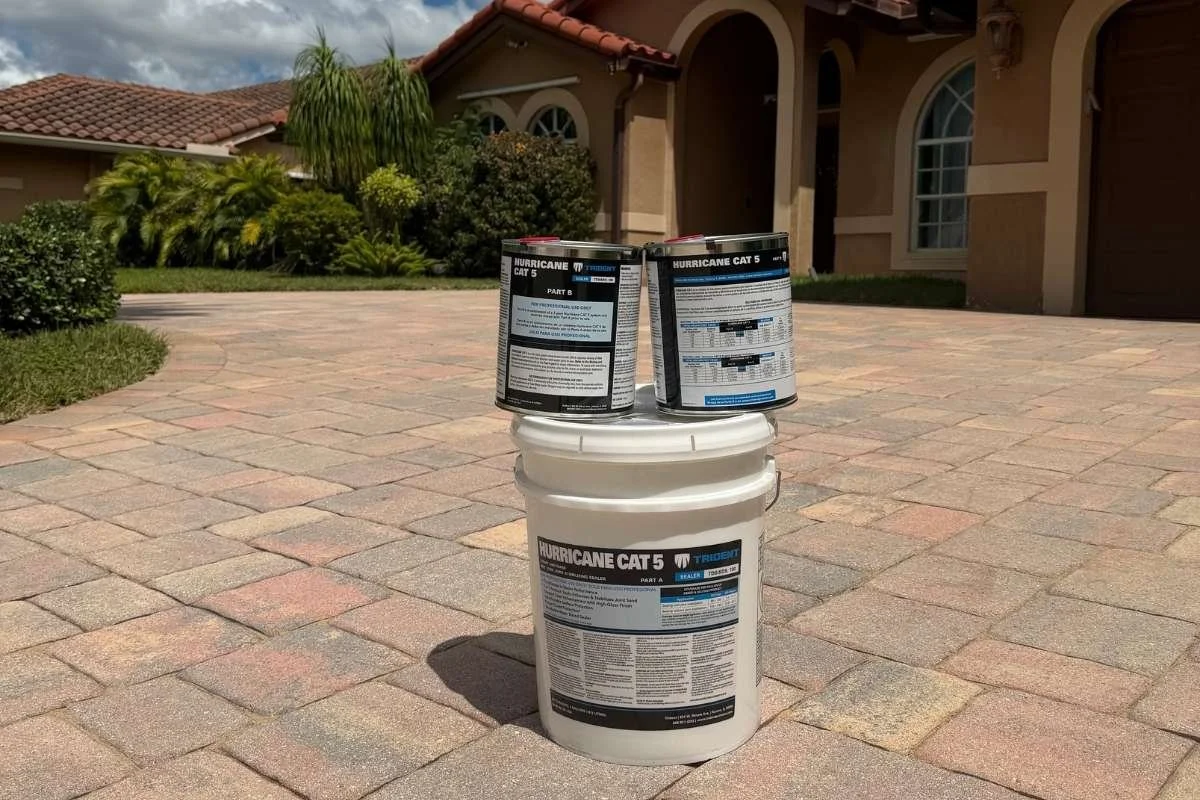
For this project, the pavers were sealed using a two-part wet look joint-stabilizing sealer after cleaning, resanding, and drying.
The product was selected for this paver system because the project required more than color enhancement. It also needed joint stabilization after resanding.
Two applications were used to support a more consistent finish across the driveway and side walkway.
The sealing stage helped enhance the color of the pavers, improve the overall appearance of the surface, and stabilize the newly installed joint sand.
As with any paver project, the final result depends on several factors:
surface condition
cleaning quality
joint sand condition
moisture
product selection
application method
weather
exposure to sun and shade
This is why paver sealing should always be evaluated as a full process, not as a single step.
What Changed After Cleaning, Resanding, and Sealing
The most visible difference was the overall definition of the surface.
Before the project, the pavers looked dull, the joint lines were darker, and weeds interrupted the driveway and side walkway.
After cleaning, resanding, and sealing, the surface looked more consistent, the paver colors appeared more defined, and the joints looked cleaner and more controlled.
The side walkway showed one of the clearest improvements.
Before cleaning, weeds and buildup made the walkway look neglected. After the process, the walkway looked cleaner, more open, and more aligned with the rest of the property.
The driveway also looked more finished after the sealing stage, with improved color and a cleaner overall appearance.
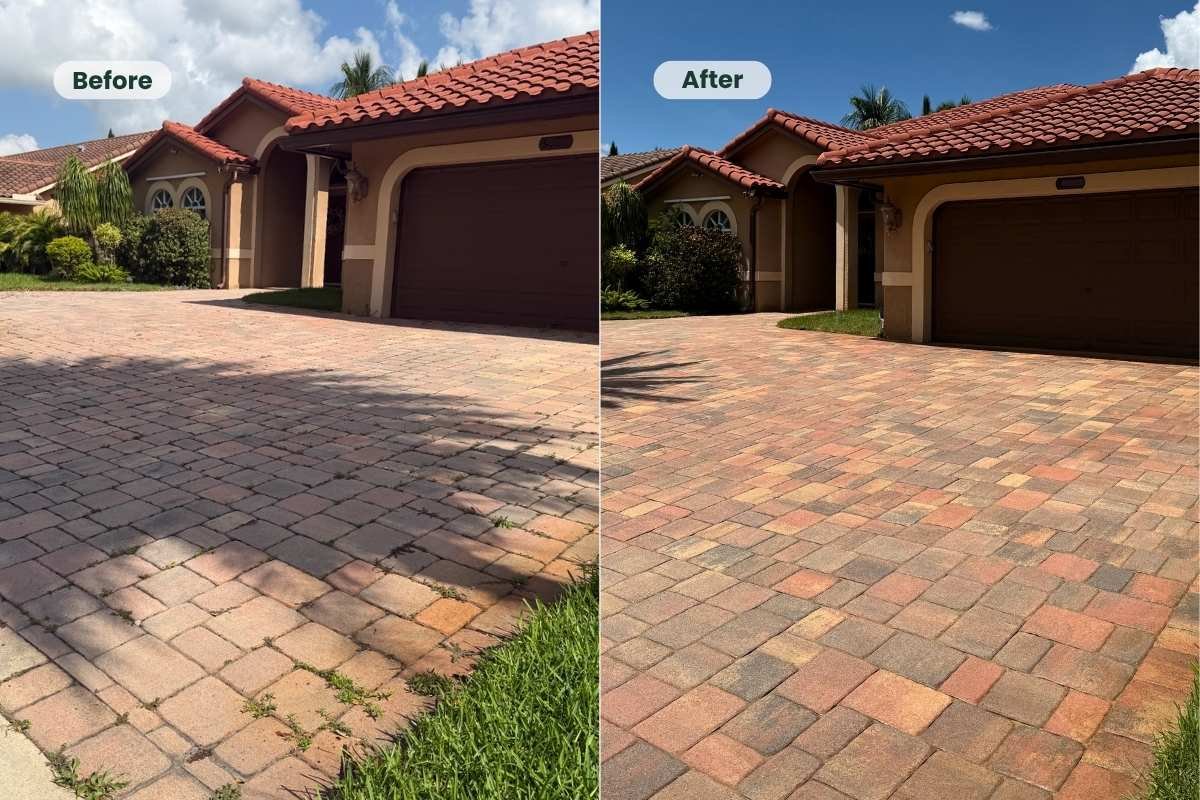
The driveway and side walkway were treated as part of the same paver cleaning, resanding, and sealing project in Coral Springs.
This kind of result is not created by sealing alone.
It comes from the full sequence: cleaning, weed removal, resanding, drying, and controlled sealer application.
Why Process Matters in Paver Cleaning and Sealing
Every paver surface responds differently.
Some pavers only need cleaning.
Some need cleaning and resanding.
Some need stain treatment before sealing.
Some need evaluation for old sealer, white haze, trapped moisture, or surface damage before any new sealer is applied.
That is why the process should start with assessment.
On this Coral Springs project, the visible weeds, joint condition, and surface buildup made it clear that sealing alone was not the right first step.
The surface had to be prepared before protection could be applied.
For homeowners, this is one of the most important lessons:
If pavers are stained, weedy, faded, or losing joint sand, the question is not only “Should I seal them?”
The better question is:
What does the surface need before sealing?
What Homeowners Can Learn From This Project
This project shows several important points about paver maintenance in South Florida.
1. Pavers should be cleaned before sealing
Sealing over dirt, weeds, stains, or organic buildup can affect the final result. Cleaning helps reveal the true surface condition before deciding what comes next.
2. Weeds may point to joint issues
Visible weeds often mean the joints need attention. Removing weeds is part of the process, but resanding may also be needed when joint sand is dirty, loose, or washed out.
3. Resanding can be part of the sealing system
When old joint sand is no longer performing well, replacing it before sealing can help create a cleaner and more stable surface.
4. Drying time matters
The surface and joints need to be in the right condition before sealer is applied. In South Florida, weather and humidity can affect scheduling.
5. The final look depends on preparation
A wet look or enhanced finish is not only about the product. It depends on cleaning, surface condition, joint preparation, and controlled application.
When to Consider Paver Cleaning and Sealing
Professional paver sealing in Coral Springs may be worth considering when your driveway, patio, walkway, or pool deck shows signs such as:
faded paver color
weeds between joints
dirty or washed-out joint sand
dark joint lines
surface stains
organic buildup
uneven appearance
recurring dirt after rain
dull or worn finish
loose or unstable-looking joints
If several of these signs are present, the surface may need more than a quick cleaning or a sealer application.
A surface evaluation can help determine whether the next step should be cleaning, resanding, sealing, or additional preparation.
FAQs
Do pavers need to be cleaned before sealing?
Yes. Pavers should be cleaned before sealing so dirt, weeds, stains, and organic buildup are removed from the surface and joints. Cleaning also helps reveal whether additional preparation is needed.
When do pavers need resanding?
Pavers may need resanding when joint sand is dirty, washed out, uneven, or missing. Weed growth between pavers can also be a sign that the joints need attention.
Can pavers be sealed without resanding?
Sometimes, but not always. If the existing joint sand is stable and in good condition, resanding may not be necessary. If joints are loose, dirty, washed out, or uneven, resanding may be part of the process.
What does joint-stabilizing sealer do?
A joint-stabilizing sealer helps bind or stabilize the joint sand after resanding while also sealing the surface. The result depends on the product, surface condition, preparation, and application method.
How long do pavers need to dry before sealing?
Drying time depends on weather, humidity, shade, surface condition, and the product being used. In South Florida, moisture and humidity can affect timing, so the surface should be evaluated before sealing.
Does sealing stop weeds from growing between pavers?
Sealing and joint stabilization can help reduce conditions that allow weeds to grow, but no exterior surface process can guarantee that weeds will never return. Ongoing maintenance still matters.
Is paver cleaning and sealing worth it for a driveway?
It can be, especially when the driveway is faded, stained, weedy, or losing joint sand. A complete cleaning and sealing process can improve appearance, define the joints, and help protect the surface when properly prepared.
The Bottom Line
This Coral Springs project shows why paver cleaning and sealing should be treated as a process.
The driveway and side walkway did not simply need sealer.
They needed cleaning, weed removal, stain attention, resanding, drying time, and two controlled sealer applications.
That sequence helped create a cleaner, more defined, and more finished surface.
For homeowners in South Florida, the right paver service depends on what the surface is showing.
Sometimes the next step is cleaning.
Sometimes it is resanding.
Sometimes it is sealing.
And often, it is a combination of all three.
Need help evaluating your pavers?
A surface evaluation can help determine whether your driveway, walkway, patio, or pool deck needs cleaning, resanding, sealing, or additional preparation.